

How to compare faces in images using aws rekognition 2023
Amazon Rekognition provides a convenient way for performing facial recognition and analysis. In this article, we gonna learn how to compare faces in two images using Amazon rekognition.
We can compare images by passing the source and target images as an image byte array (base64-encoded image bytes), or Amazon S3 objects
In this article, we will learn both ways.
1. Let's create a new express project using express generator.
npm i -g express-generatorexpress node-rekognition --no-viewcd node-rekognition2. Install @aws-sdk/client-rekognition npm package.
npm i @aws-sdk/client-rekognition3. Install dotenv npm package.
npm i dotenvAfter Installation import dotenv in app.js
require('dotenv').config();4. Create a .env file in the root and add these environment variables.
AWS_ACCESS_KEY_ID=
AWS_SECRET_ACCESS_KEY=
AWS_REGION=
Checkout- Generate AWS Credentials
Note:- Don't forget to add AmazonRekognitionFullAccess permission for your credentials.
5. Create a utils folder and inside this folder create a file rekognition.util.js
const { RekognitionClient } = require('@aws-sdk/client-rekognition');

const config = {
    region: process.env.AWS_REGION,
    credentials: {
        accessKeyId: process.env.AWS_ACCESS_KEY_ID,
        secretAccessKey: process.env.AWS_SECRET_ACCESS_KEY
    }
}
const client = new RekognitionClient(config);

module.exports = client;
6. Install multer and lodash npm packages.
npm i multer lodashMulter adds a body object and a file or files object to the request object. The body object contains the values of the text fields of the form, the file or files object contains the files uploaded via the form.
file object
{
    fieldname: 'file',
    originalname: 'pic1.png',
    encoding: '7bit',
    mimetype: 'image/png',
    destination: 'storage/',
    filename: '1676811566803_875736536.png',
    path: 'storage\\1676811566803_875736536.png',
    size: 339337
}
7. Create a helpers folder and inside this folder create a file upload.helper.js
const multer = require('multer');
const path = require('path');

const storage = multer.diskStorage({
    destination: (req, file, cb) => {
        cb(null, 'storage/')
    },
    filename: (req, file, cb) => {
        const fileName = `${Date.now()}_${Math.round(Math.random() * 1E9)}`;
        cb(null, `${fileName}${path.extname(file.originalname)}`);
    }
});

const upload = multer({ storage: storage });

module.exports = upload;
Note:- Don't forget to create storage folder.
8. Create a services folder and inside this folder create a file rekognition.service.js
const { first } = require('lodash');
const { CompareFacesCommand } = require('@aws-sdk/client-rekognition');

const client = require('../utils/rekognition.util');

exports.compareFaces = (sourceImageBytes, targetImageBytes) => {
    const input = {
        SourceImage: {
            Bytes: sourceImageBytes
        },
        TargetImage: {
            Bytes: targetImageBytes
        },
        SimilarityThreshold: 70
        /**
         * only faces with a similarity score of greater than or equal to 70% are returned in the response.
         * You can change this value by specifying the SimilarityThreshold parameter.
         */
    }
    const command = new CompareFacesCommand(input);
    return client.send(command)
        .then(result => {
            return first(result.FaceMatches)?.Similarity || 0;
        })
        .catch(error => {
            /**
             * If no faces are detected in the source or target images,
             * CompareFaces returns an InvalidParameterException error.
             * return similarity = 0
             */
            if (error.Code == 'InvalidParameterException') {
                return 0;
            } else {
                throw error;
            }
        });
}
9. Create a controllers folder and inside this folder create a file rekognition.controller.js
const fs = require('fs');
const util = require('util');
const path = require('path');
const readFile = util.promisify(fs.readFile);
const { compareFaces } = require('../services/rekognition.service');

exports.faceAuthentication = async (req, res) => {
    const sourceImageBytes = await readFile(path.join(__dirname, '../storage/image1.jpeg')); // Already stored.
    const targetImageBytes = await readFile(path.join(__dirname, `../storage/${req.file.filename}`));
    const similarity = await compareFaces(sourceImageBytes, targetImageBytes);
    let message;
    if (similarity) {
        message = 'Face authentication successful';
    } else {
        message = 'Face authentication failed';
    }
    return res.json({ message, similarity });
}
Note:- Don't forget to add the source image to the storage folder(image1.jpeg).
In the actual project, it can be user's profile pic that is already stored in the storage folder.
10. Update routes.
routes/index.js
const express = require('express');
const router = express.Router();
const upload = require('../helpers/upload.helper');
const rekognitionController = require('../controllers/rekognition.controller');

router.post('/face-authentication', upload.single('file'), rekognitionController.faceAuthentication);

module.exports = router;
11. Finally start the project and test the API.
npm start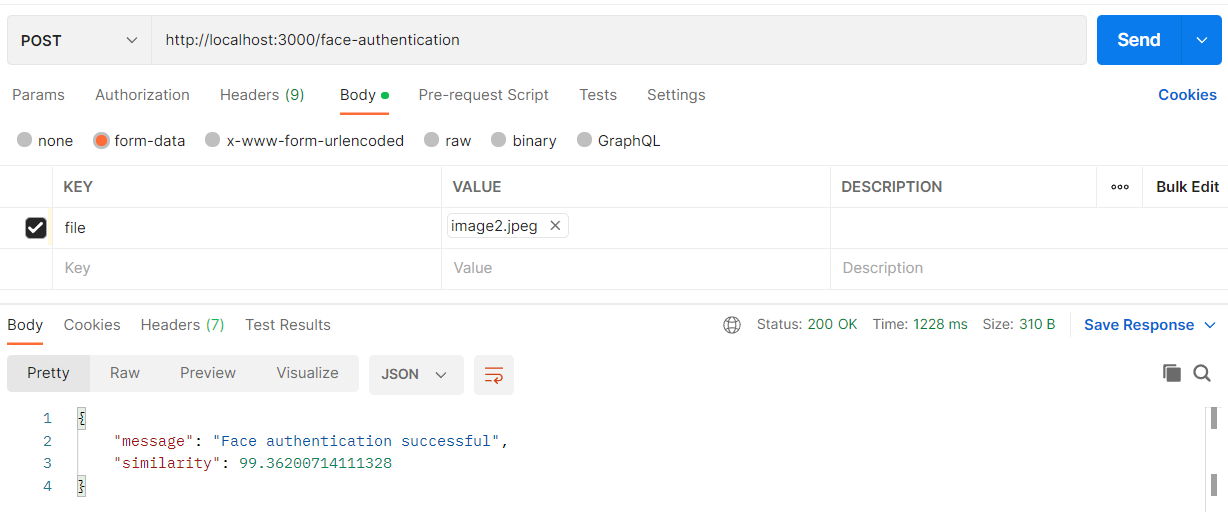
Part II - Using S3 Objects
12. Install multer-s3 and @aws-sdk/client-s3 npm packeges.
npm i multer-s3 @aws-sdk/client-s3Note:- Multer s3 uploads file to S3 and modify the file object
{
    "fieldname": "file",
    "originalname": "2022-07-02 230849.jpg",
    "encoding": "7bit",
    "mimetype": "image/jpeg",
    "size": 144651,
    "bucket": "node-bucket-2023",
    "key": "1676811566803_875736536.jpg",
    "acl": "public-read",
    "contentType": "image/jpeg",
    "contentDisposition": null,
    "contentEncoding": null,
    "storageClass": "STANDARD",
    "serverSideEncryption": null,
    "location": "https://node-bucket-2023.s3.ap-south-1.amazonaws.com/1676811566803_875736536.jpg",
    "etag": "\"d3d8bbe80dedaf3b4c6e67ef8ab66e16\""
}
13. Update .env file
AWS_ACCESS_KEY_ID=
AWS_SECRET_ACCESS_KEY=
AWS_REGION=
AWS_BUCKET=
Note:- Don't forget to add AmazonS3FullAccess permission for your credentials.
Checkout- Generate AWS Credentials
Checkout- Create S3 Bucket
14. Create s3.util.js inside the utils folder
const { S3Client } = require('@aws-sdk/client-s3');

const config = {
    region: process.env.AWS_REGION,
    credentials: {
        accessKeyId: process.env.AWS_ACCESS_KEY_ID,
        secretAccessKey: process.env.AWS_SECRET_ACCESS_KEY
    }
}
const s3 = new S3Client(config);

module.exports = s3;
15. Create uploads3.helper.js inside the heplers folder
const multerS3 = require('multer-s3');
const multer = require('multer');
const path = require('path');

const s3 = require('../utils/s3.util');

const upload = multer({
    storage: multerS3({
        s3,
        acl: 'public-read',
        bucket: process.env.AWS_BUCKET,
        contentType: multerS3.AUTO_CONTENT_TYPE,
        key: (req, file, cb) => {
            const fileName = `${Date.now()}_${Math.round(Math.random() * 1E9)}`;
            cb(null, `${fileName}${path.extname(file.originalname)}`);
        }
    })
});

module.exports = upload;
16. Update rekognition.service.js
const { first } = require('lodash');
const { CompareFacesCommand } = require('@aws-sdk/client-rekognition');

const client = require('../utils/rekognition.util');

exports.compareFaces = (sourceImageBytes, targetImageBytes) => {
    const input = {
        SourceImage: {
            Bytes: sourceImageBytes
        },
        TargetImage: {
            Bytes: targetImageBytes
        },
        SimilarityThreshold: 70
        /**
         * only faces with a similarity score of greater than or equal to 70% are returned in the response.
         * You can change this value by specifying the SimilarityThreshold parameter.
         */
    }
    const command = new CompareFacesCommand(input);
    return client.send(command)
        .then(result => {
            return first(result.FaceMatches)?.Similarity || 0;
        })
        .catch(error => {
            /**
             * If no faces are detected in the source or target images,
             * CompareFaces returns an InvalidParameterException error.
             * return similarity = 0
             */
            if (error.Code == 'InvalidParameterException') {
                return 0;
            } else {
                throw error;
            }
        });
}

exports.compareFacesS3 = (sourceImageName, targetImageName) => {
    const input = {
        SourceImage: {
            S3Object: {
                Bucket: process.env.AWS_BUCKET,
                Name: sourceImageName
            }
        },
        TargetImage: {
            S3Object: {
                Bucket: process.env.AWS_BUCKET,
                Name: targetImageName
            }
        },
        SimilarityThreshold: 70
        /**
         * only faces with a similarity score of greater than or equal to 70% are returned in the response.
         * You can change this value by specifying the SimilarityThreshold parameter.
         */
    }
    const command = new CompareFacesCommand(input);
    return client.send(command)
        .then(result => {
            return first(result.FaceMatches)?.Similarity || 0;
        })
        .catch(error => {
            /**
             * If no faces are detected in the source or target images,
             * CompareFaces returns an InvalidParameterException error.
             * return similarity = 0
             */
            if (error.Code == 'InvalidParameterException') {
                return 0;
            } else {
                throw error;
            }
        });
}
17. Update rekognition.controller.js
const fs = require('fs');
const util = require('util');
const path = require('path');
const readFile = util.promisify(fs.readFile);
const { compareFaces, compareFacesS3 } = require('../services/rekognition.service');
exports.faceAuthentication = async (req, res) => {
const sourceImageBytes = await readFile(path.join(__dirname, '../storage/image1.jpeg')); // Already stored.
const targetImageBytes = await readFile(path.join(__dirname, `../storage/${req.file.filename}`));
const similarity = await compareFaces(sourceImageBytes, targetImageBytes);
let message;
if (similarity) {
message = 'Face authentication successful';
} else {
message = 'Face authentication failed';
}
return res.json({ message, similarity });
}
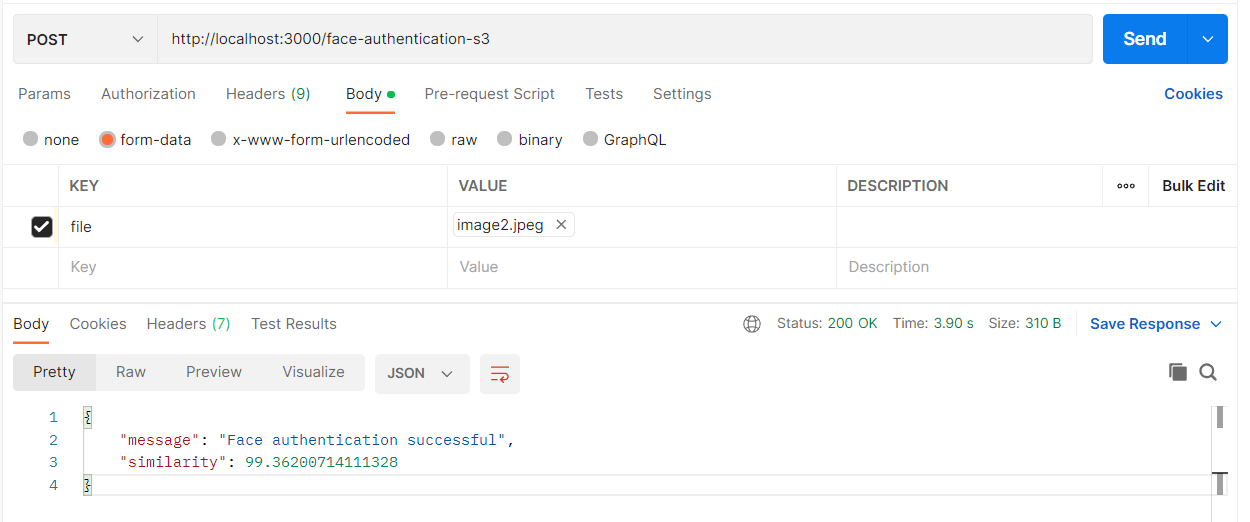
exports.faceAuthenticationS3 = async (req, res) => {
const sourceImageName = 'image1.jpeg'; // Already uploaded on S3 bucket.
const targetImageName = req.file.key;
const similarity = await compareFacesS3(sourceImageName, targetImageName);
let message;
if (similarity) {
message = 'Face authentication successful';
} else {
message = 'Face authentication failed';
}
return res.json({ message, similarity });
}Note:- Don't forget to upload the source image (image1.jpeg) on your s3 bucket.
In the actual project, it can be user's profile pic that is already uploaded to the s3 bucket.
18. Update routes
const express = require('express');
const router = express.Router();
const upload = require('../helpers/upload.helper');
const uploadS3 = require('../helpers/uploads3.helper');
const rekognitionController = require('../controllers/rekognition.controller');

router.post('/face-authentication', upload.single('file'), rekognitionController.faceAuthentication);

router.post('/face-authentication-s3', uploadS3.single('file'), rekognitionController.faceAuthenticationS3);

module.exports = router;
19. Finally restart the project.
npm start
https://github.com/ultimateakash/node-rekognition
If you facing any issues. don't hesitate to comment below. I will be happy to help you.
Thanks.


Leave Your Comment